Dropdown menus are a common and user-friendly way to navigate through complex website structures. Creating a multilevel dropdown menu using CSS is a great way to organize your site’s content and make it easily accessible to users. In this tutorial, you will learn through the steps to create a simple multilevel dropdown menu with source code.
Step 1: Create HTML Structure of the Multilevel Dropdown Menu
<!DOCTYPE html>
<html>
<head>
<link rel="stylesheet" href="styles.css" />
</head>
<body>
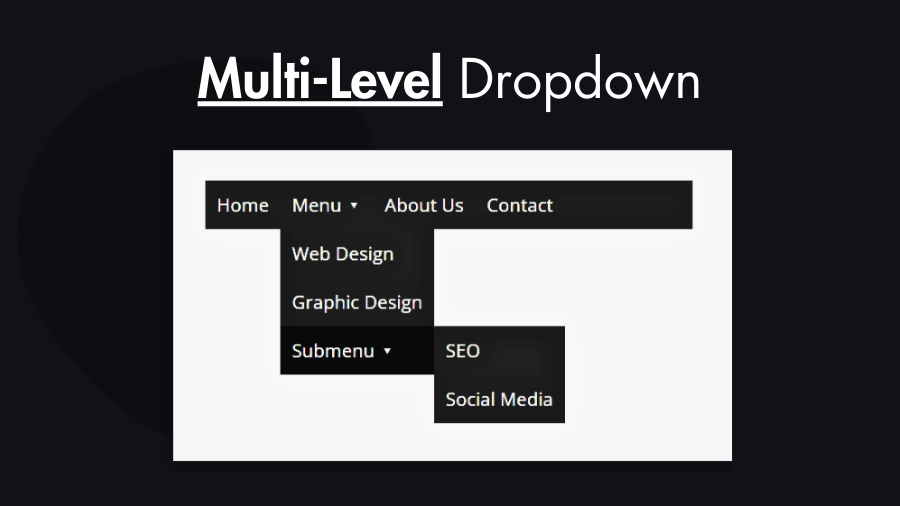
<nav class="menu">
<ul>
<li><a href="#">Home</a></li>
<li>
<a href="#">Services ▾</a>
<ul>
<li><a href="#">Web Design</a></li>
<li><a href="#">Graphic Design</a></li>
<li>
<a href="#">Digital Marketing ▾</a>
<ul>
<li><a href="#">SEO</a></li>
<li><a href="#">Social Media</a></li>
</ul>
</li>
</ul>
</li>
<li><a href="#">About Us</a></li>
<li><a href="#">Contact</a></li>
</ul>
</nav>
</body>
</html>In this structure, we have a navigation menu with multiple levels of dropdowns:
- Each
<ul>represents a list, and<li>elements represent menu items. - The nested
<ul>elements represent submenus.
Step 2: “styles.css” CSS Styles for the Dropdown Menu
To make the menu visually appealing and functional, you’ll need to apply CSS styles. We’ll use an external stylesheet (styles.css) for this purpose:
.menu {
    background: #222;
}

.menu ul {
    all: unset;
    list-style: none;
    display: flex;
    flex-wrap: wrap;
    background: #222;
}
.menu ul li {
    position: relative;
}
.menu ul li a {
    display: block;
    padding: 10px;
}

/* Style the submenus */
.menu ul li ul {
    position: absolute;
    display: none;
    flex-direction: column;
}

.menu ul ul li {
    width: max-content;
    min-width: 100%;
    max-width: 200px;
}

.menu ul a {
    all: unset;
    color: #fff;
    cursor: pointer;
}
.menu ul a:hover {
    background: rgba(0, 0, 0, 0.7);
}

.menu ul li:hover > ul {
    display: flex; /* Show submenus on hover */
}

/* Style the third-level submenu */
.menu ul ul ul {
    top: 0;
    left: 100%;
}
In the CSS code above, we apply styles to different levels of the menu. We use the display: none; property to hide submenus by default and display: flex; to show them when their parent menu item is hovered over.
Customization:
You can customize the menu further by adjusting colors, fonts, and spacing to match your website’s design.
Additionally, you can add JavaScript for more interactive behavior, such as closing the menu when clicking outside or highlighting the active menu item based on the current page.
With this tutorial, you’ve learned how to create a simple multilevel dropdown menu using CSS. It’s a fundamental building block for improving navigation and enhancing the user experience on your website.
Feel free to experiment and expand on this foundation to create more complex and visually appealing menus for your web projects.