Creating a basic website is a great way to learn the fundamentals of web development. In this step-by-step tutorial, you will learn how to create a simple website using HTML and CSS. By the end, you’ll have a basic but functional website structure that you can expand upon as you continue your journey into web development.
Prerequisites to create a simple website:
To follow along with this tutorial, you’ll need a basic understanding of HTML and CSS. If you’re new to web development, don’t worry! We’ll explain each step thoroughly, making it accessible for beginners.
Steps To Create A Simple Website Using HTML and CSS
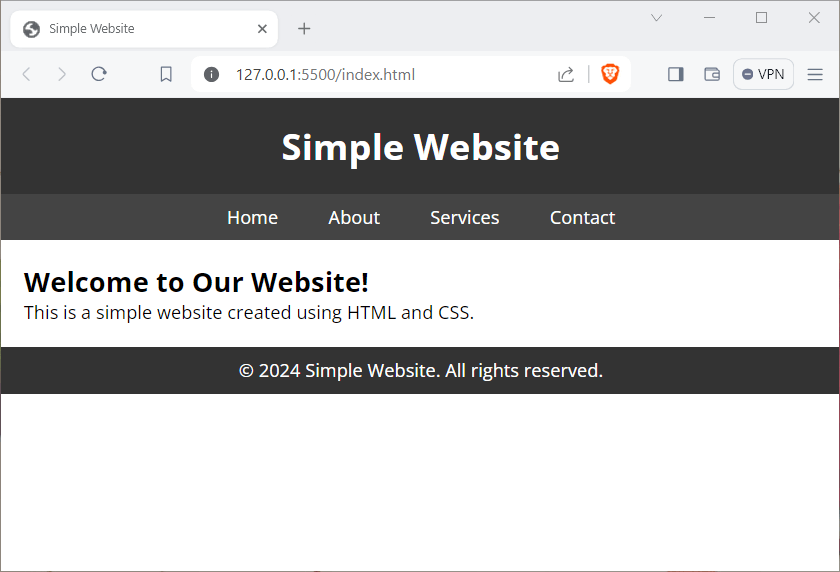
Here is the demo of the simple website that we are going to build here using just HTML and CSS:
Step 1: Create a New Folder for Your Site
Before diving into the code, let’s set up the project structure. Create a new folder for your project and name it as you wish. Inside this folder, create two files: index.html and styles.css. The HTML file will contain the structure of our website, while the CSS file will handle the styling.

Step 2: Writing a Very Simple HTML Structure
Open the index.html file in your preferred text editor or integrated development environment (IDE). Begin by defining the basic structure of your HTML document using the following code:
<!DOCTYPE html>
<html lang="en">
<head>
<meta charset="UTF-8" />
<meta name="viewport" content="width=device-width, initial-scale=1.0" />
<title>Simple Website</title>
<!-- Linking the styles.css file here -->
<link rel="stylesheet" href="styles.css" />
</head>
<body>
<!-- Header Section -->
<header>
<h1>Simple Website</h1>
</header>
<!-- Navigation Section -->
<nav>
<ul>
<li><a href="#">Home</a></li>
<li><a href="#">About</a></li>
<li><a href="#">Services</a></li>
<li><a href="#">Contact</a></li>
</ul>
</nav>
<!-- Main Content Section -->
<main>
<h2>Welcome to Our Website!</h2>
<p>This is a simple website created using HTML and CSS.</p>
</main>
<!-- Footer Section -->
<footer>
<p>© 2024 Simple Website. All rights reserved.</p>
</footer>
</body>
</html>Step 3: CSS Styling for the HTML Structure
Open the styles.css file and add the following CSS to style your website:
/* Adding Custom Font using Google Fonts */
@import url("https://fonts.googleapis.com/css2?family=Open+Sans:wght@400;700&display=swap");

/* Resetting default margins and paddings */
* {
    margin: 0;
    padding: 0;
    box-sizing: border-box;
}

/* Applying the custom font to the body */
body {
    font-family: "Open Sans", sans-serif;
}

/* Styling the header */
header {
    background-color: #333;
    color: #fff;
    text-align: center;
    padding: 20px 0;
}

/* Styling the navigation menu */
nav ul {
    list-style-type: none;
    background-color: #444;
    text-align: center;
    padding: 10px 0;
}

nav ul li {
    display: inline;
}

nav ul li a {
    text-decoration: none;
    color: #fff;
    padding: 10px 20px;
}

/* Styling the main content */
main {
    padding: 20px;
}

/* Styling the footer */
footer {
    background-color: #333;
    color: #fff;
    text-align: center;
    padding: 10px 0;
}
This CSS code provides styling for the header, navigation menu, main content area, and footer.
Step 4: Test Your Simple Website
Save your changes and open the index.html file in a web browser. You should see your simple website with a header, navigation menu, main content area, and footer.
Step 5: Customize Your Website
Feel free to customize the content and styling according to your preferences. Experiment with different colors, fonts, and layout adjustments in the CSS file to make the website your own.
Congratulations! You’ve successfully created a simple website using HTML and CSS. This project provides a solid foundation for further exploration into web development.